It seems this server is behind NAT. What is its public IPv4 address or hostname? We need it for the clients to connect to the server. # 输入公网IP地址/或是域名 Public IPv4 address or hostname: 43.138.138.17
默认不启用IPV6
1 2 3 4 5
Checking for IPv6 connectivity...
Your host does not appear to have IPv6 connectivity.
Do you want to enable IPv6 support (NAT)? [y/n]: n
设置端口
默认1194,选1;可以自定自定义端口,也可以在范围49152-65535随机端口
1 2 3 4 5
What port do you want OpenVPN to listen to? 1) Default: 1194 2) Custom 3) Random [49152-65535] Port choice [1-3]: 1
设置协议
默认UDP,选1
1
2
3
4
5
What protocol do you want OpenVPN to use? UDP is faster. Unless it is not available, you shouldn't use TCP. 1) UDP 2) TCP Protocol [1-2]: 1
设置DNS
默认当前系统解析器,选13,自定义DNS
1 2 3 4 5 6 7 8 9 10 11 12 13 14 15 16 17 18 19
What DNS resolvers do you want to use with the VPN? 1) Current system resolvers (from /etc/resolv.conf) 2) Self-hosted DNS Resolver (Unbound) 3) Cloudflare (Anycast: worldwide) 4) Quad9 (Anycast: worldwide) 5) Quad9 uncensored (Anycast: worldwide) 6) FDN (France) 7) DNS.WATCH (Germany) 8) OpenDNS (Anycast: worldwide) 9) Google (Anycast: worldwide) 10) Yandex Basic (Russia) 11) AdGuard DNS (Anycast: worldwide) 12) NextDNS (Anycast: worldwide) 13) Custom DNS [1-12]: 13 # 主DNS Primary DNS: 114.114.114.114 # 备用,直接回车跳过 Secondary DNS (optional)
启用压缩
默认不启用,选n
1 2
Do you want to use compression? It is not recommended since the VORACLE attack makes use of it. Enable compression? [y/n]: n
自定义加密
默认不启用,选n
1 2 3 4 5 6
Do you want to customize encryption settings? Unless you know what you're doing, you should stick with the default parameters provided by the script. Note that whatever you choose, all the choices presented in the script are safe. (Unlike OpenVPN's defaults) See https://github.com/angristan/openvpn-install#security-and-encryption to learn more.
Customize encryption settings? [y/n]: n
回车后就自动安装了。 安装完成会提示进行第1个客户端配置
客户端配置
客户端名称,这个名称必须是字母数字组合,可以包含下划线或减号。
1 2 3
Tell me a name for the client. The name must consist of alphanumeric character. It may also include an underscore or a dash. Client name: thinkpad_e14
默认无密码客户端
1 2 3 4 5
Do you want to protect the configuration file with a password? (e.g. encrypt the private key with a password) 1) Add a passwordless client 2) Use a password for the client Select an option [1-2]: 1
生成的配置文件
文件位置/home/ubuntu/thinkpad_e14.ovpn.
1 2
The configuration file has been written to /home/ubuntu/thinkpad_e14.ovpn. Download the .ovpn file and import it in your OpenVPN client.
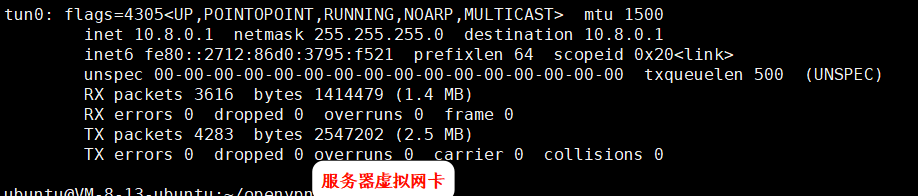
完成安装并运行,会生成1个虚拟网卡
服务器虚拟网卡
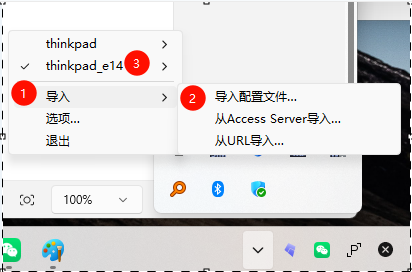
配置客户端
运行一键安装脚本
1
sudo ./openvpn-install.sh
新增用户
1
2
3
4
5
6
What do you want to do? 1) Add a new user 2) Revoke existing user 3) Remove OpenVPN 4) Exit Select an option [1-4]: 1
新增无密码客户端
1 2 3 4 5
Do you want to protect the configuration file with a password?
(e.g. encrypt the private key with a password)
   1) Add a passwordless client
   2) Use a password for the client
Select an option [1-2]: 1